 Guides
 Dangers
- Loss of fingers
- Electrocution
- Biblical sewage explosion
- Screwdriver
- Silicon grease If in doubt call a professional!!
- Watch the video!
Tools needed
Saniflo repair
READ THE DANGERS SECTION
The idea of this is so you get an idea of your Macerator, so you know if your engineer is doing his job correctly, if you attempt a repair yourself, be careful. I cannot stress enough - you will loose fingers, or have a gallon of sewage spayed on your bathroom ceiling if you do this with the power still on - be warned. A saniflo has an automatic overheat switch inside - often they 'appear' to be dead, but are just waiting to cool down to restart - BE SURE ITS OFF! This guide is free and funded only by adverising revenue .... By rights relevant saniflo spares specialists should show up on the RHS of the page.
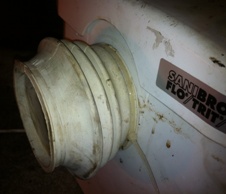
This is a saniflo...... there are several types, but all operate on the same principal - if your saniflo has a small side connection too, dont worry, it has roughly the same innards. Ok, so first of all, whats the problem?
runs / makes a noise but doesnt empty? - blockage
runs constantly? - stuck microswitch
makes horrible noises? - foreign object in pump or cutter
runs and stops, runs and stops? - non return valve stuck
Doesnt empty well? - clogged
Either way, you will need to start where I do - at the front, and work on from there. This assumes you dont have a blocked outlet pipe - test by disconnecting the outlet pipe, putting it into a bucket and switching the power on for a second - be prepared - the power of a working saniflo is incredible. good flow into bucket = blocked pipe (saniflo ok).
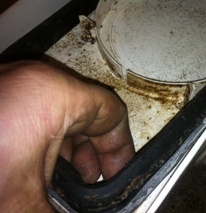
Ok, so first off, get a towel, and put between toilet and saniflo, then slacken off the jubilee clip holding the bellows to the toilet outlet - you will have some escape of water - if the level in the toilet is above the 'normal' level, you will have a significant excape - consider bailing out the toilet into a bucket if this is the case.
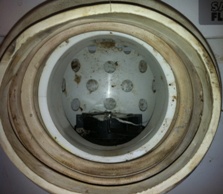
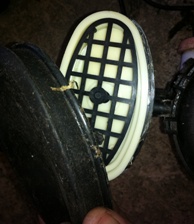
Slip the bellows back to expose the cutter head and cage. It will be a bit cramped, but this is usually possible WITHOUT removing toilet or saniflo. These two pictures show the cutter head - the second one is so you can see it more clearly - at this point you will only be looking into the bellows. Ok, so to explain - the job of the cutter head is to shred anything in the cage (white plastic pot with holes that surrounds the head) till its small enough to pass through the holes - small enough for the pump inside to handle. This is where the majority of problems occur - anything that isnt paper based toilet paper will form a clog here - feminine hygeine products, baby wipes, expensive toilet paper, disposable razors, rimblocks, dental floss, plastic bags, etc, all end up here. If there is, it will be fairly obvious......... A bent coathanger or long thin nosed pliers can be used to pick these out. If its not obvious, look arround the base of the pot, blocked lower holes can be difficult to spot, but with a torch you should see. If there is no obvious blockage, (or in fact even if there was) rotate the cutter head with your fingers..... it should move freely with no snagging or catching..... check for string etc wrapped around the head, rotate it backwards to loosen........ or pull with pliers. The head should rotate easily with one finger. Note - if the power is on, and the overheat stat clicks back in now, at best you will loose a finger. At worst, your whole hand.
If you have found a blockage, and cleared it - pop it back together and test....... if not....... read on
Now, to progress further you will need to remove the saniflo from its location. The wire is usualy long enough to allow this, but you will have to disconnect the outlet pipe..... held on with a jubilee clip - pic later - loosen and slide the pipe off..... have a bucket or towels ready - there is likely to be a fair bit of 'water' (ha! you know what I mean).
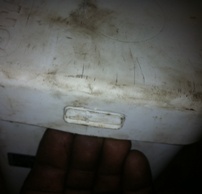
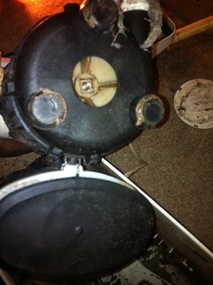
Now you have the unit out, we need to remove the top. No tools are needed, look at the clips on each end. Dig your fingers under the lip on both sides and the lid can be pulled off.
Now you have the lid off, the most valuable tip is, THE SEAL SITS ON THE RIDGE IN THE LID, it does not fit on the body, and the body seals between the outer wall of the lid and the seal. Easy when you know how - the first few times I did this I spent ages trying to get the seal on the body! (that was 10 years ago!)
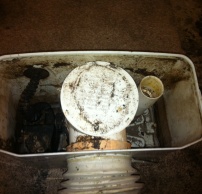
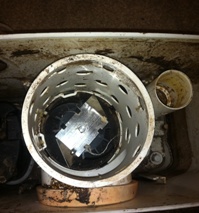
Ok, top off, you see the top of the macerator pot.... you can unclip the top and check for gunk.... anything missed before and check the rotation. If the saniflo is still powered up, this is when it will empty the 5 odd litres of sewage at extreme speed from the pipe on the right...... it will certainly reach the ceiling....
Notice the blade rotation - sharp leading edge..... rotate backwards to unwind stringy obstructions.
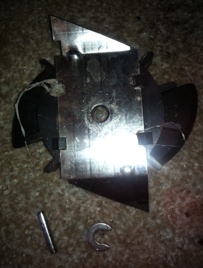
BTW, if you have cleared the pump and cutter and the motor is still stiff to turn - the motor is either seizing - new saniflo needed - or theres gunge stuck under the cutter head - push off the circlip holding it on, (two screwdrivers) and ease it off - be patient, it wont be easy!
You will most likely find something stuck in the protective pot it runs in. On that point - a saniflo that can be turned freely by hand but just 'humms' and doesnt pump - has a failed start capacitor - hidden under the microswitch diaphragm... large cylinder with two wires..... see next section
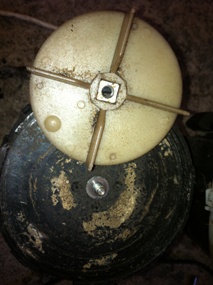
You can now lift the entire motor and pump assembly out - no tools needed! just lift it straight up about 5 inches an then lay it down across the body of the unit for inspection - it cant be withdrawn fully as the wire holds it in place. (you can pull the grommet the wire runs through out of the main casing, but its not easy to get back in so i dont recommend it)
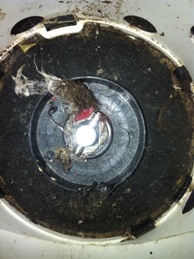
Underneath you will see the impellor of the main pump. The smaller saniflos have a plastic impellor, the larger ones have a stainless steel one and a shearing knife at the entrance. either way, obstructions are easy to see, easy to pick out with a bit of wire or thin nosed pliers. The upstand pipe can be unclipped and checked for blockages too (unlikely).
If your impellor is damaged, or the blockage is to hard to get at, unclip the pump base, put the cutter and drive pin back on, and while holding the cutter head carefully (cloth?) unscrew the impellor anticlockwise from its shaft. Remove anything wrapped around the shaft or under the impellor.
Check the pump body housing for blockages too, especialy the outlet
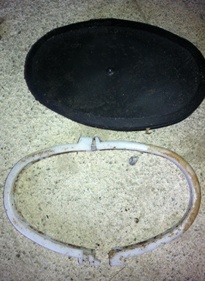

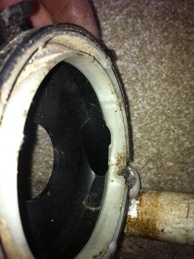
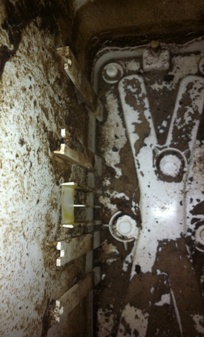
 Notice the black oval rubber disc? press it lightly and you will hear it click. This is the automatic switch that turns it on when the level gets high enough. Essentialy, underneath it is a microswitch. The usual problems with this are - rubber gets old and stiff - it should be soft, light flexible rubber - like a thick membrane.
Water sometimes gets under the membrane - unclip the white clip and dry out - or more usualy - something gets stuck between the base/floor of the unit and the rubber membrane and jams the switch on. Clean the area it sits on carefully before replacing.
To investigate further, .remove the diaphragm, push in the two locating tabs and prise out the white section. The start capacitor will usualy either be bulged or split if failed (but not always).
Its worth applying a dab of silicone grease to the shaft of the push rod as you reassemble - especialy if your having run on issues - the rod that pushes on the microswitch - passing through the white section - just pull it out and grease it lightly.
The unit can now be dropped ito place - notice the locating slots front and back? just slot it into place and check its right by looking through the bellows hole - the hole in the cage should align with the hole in the body.

While we are here, we need to look at the non return valve elbow - stuck into the top of the lid - the thing the outlet pipe attaches to - it can be removed without taking the lid off the unit - just loosen the larger jubilee that holds it to the lid. This valve is simply a flap of rubber - gunk often stops it closing fully - which lets water run back into the unit.... this is oftenthe reason for the annoying run/stop/pause/run/stop/pause fault. Running it under a hot tap often clears it nicely.
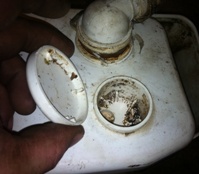
The only other thing to comment on is the vent - sometimes these will leak - often because the switch membrane is old and stiff, allowing the water level to rise to high before the unit fires. It can often be solved temporarily by removing the little foam pad from the top (just lift off the cap on top) and clean it under a hot tap.
Saniflo Notes
- 99% of all saniflo's are installed incorrectly. There should be NO ninety degree bends in the pipework - 45 degree or pulled copper bends only.
- The outlet pipe should rise as quickly as possible to its highest point then fall slightly to the discharge point, for best results.
- A rattling noise in a perfectly operational saniflo is most likely olive stones or the head of a disposable razor.
- All spares are available from saniflo themselves - and they will take orders over the phone and will sell to homeowners.