Dangers
- Noah size flood
- Screwdrivesr
- Wrench
- PTFE tape
- Silicon grease If in doubt call a professional!!
Tools needed
Toilet repair
READ THE DANGERS SECTION
The idea of this is so you get an idea of your system, so you know if your engineer is doing his job correctly, if you attempt a repair yourself,be careful
The humble bog... toilet, lavatory, etc.... If you have a problem, the following might help, it tells you how to repair and troubleshoot with common household items
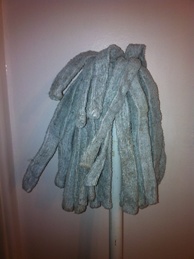
Blockages - go and get your oldest mop. wet it in the sink and then place in toilet bowl. Now rhythmicaly pump it up and down into the bottom of the toilet, forcing the water down the pan, then drawing it back up. This works best when the toilet is half full of water. Do not flush a half full toilet as it will overfill and pour out on the bathroom floor. Expect up to 20 minutes pumping to clear. Adjust your rhythum, stroke etc to maximise your 'push'. Not all mops work for this, and the ideal implement is a drain rod with a 4 inch rubber disc on the end. What is actualy happening is the mop pushes on the water, forcing it to push on the blockage. Theoreticaly this should dislodge it. The upwards pull on the mop 'sucks' on the blockage, hopefully lifting and turning it so it can run free. Consider disposing of the mop afterwards.
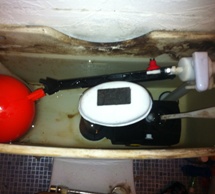
Water constantly runs into the bowl - this is one of two things - Take the top off the cistern, and look at the water level. If its high its overflowing, if theres almost none its the flush valve stuck open.
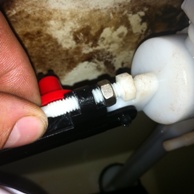
An overflowing toilet is usualy down to the ballvalve loosing its adjustment, but sometimes it needs stripping or replacing. Also check the ball is not full of water. A full guide on ballvalves is here, but usualy simply loosening the nut and tightening the screw as shown will drop the water level enough to stop it overflowing.
A stuck flush valve can usualy be fixed b a light tap or a clean. This will not be a syphon type, as they cannot get stuck, this can only be the 'release open' style, where a washered piston covers a port at the bottom of the cistern. As there are dozens of types, i wont detail them all, but the things you need to know are - most can be undone by a little twist to the main body, and withdrawn from the cistern for inspection - dont forget to check for debris in the port at the bottom.
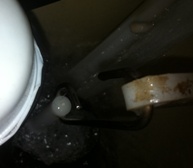
Toilet wont flush - take the lid off the cistern and check the linkages to the flush unit (bits of wire coathanger will fix these usualy), if ok, we will need to remove the flush section.If its a piston type its fairly easy, if its a syphon unit, its not so. How to do this is covered later, but once its out, turn it over and have a look at the membrane. Usualy the membrane will have disintegrated. These can be purchased from plumbers merchants, ebay etc. Alternatively they can be cut from a thick plastic back - not a carrier bag - a dog food bag is often good.
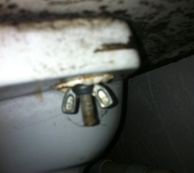
Leaks between toilet and cistern - great fun these - get down and look under the cistern, you will see two nuts, one each side - these hold the toilet and cistern together. You hopefully will be able to undo these with pliers, but often cheap ones will have rusted so its impossible. In the first instance you must isolate and disconnect the water supply and empty the cistern. Assuming its rusted solid you have three options, either cut the nuts off with a hacksaw, cut between the toilet and cistern with a hacksaw blade to cut the bottom off the syphon (its only plastic) or, if space is tight, cut out the entire syphon from inside the cistern, so the cistern can be lifted off leaving the bolts/ close coupled kit attatched to the pan. Some toilets have the bolt heads actualy in the cistern, heads exposed. In this case you can drill the heads off.
Depending on what your now left with, consider replacing the entire syphon, and close coupled kit with new ones, as quite possibly its all hacked to bits as it was difficult to remove, this is how it goes, black rubber washer goes on flush unit, sealant both sides, flush unit goes into cistern, large flat plate goes over the exposed thread, projections facing away from the cistern, bolts in place, then large nut goes on, hand tight then 1/2 to 3/4 of a turn, making sure the syphon and metal plate stay perfectly in line with long side of cistern, (3 hands needed), now the foam washer goes over the nut. Never re use an old foam washer, they 'remember' their old shape and it will leak. Now carefully place the cistern back on the pan, making sure the bolts go down the right holes. Tighten down evenly, and flush 10 times. (it often takes this many flushes for the space under the cistern to fill with water enough to show a leak.
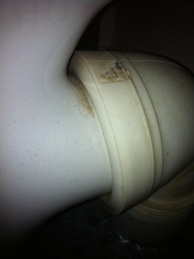
Leaks on waste pipe - ok, idealy you remove the toilet and replace the connector, but with todays advances in silicones and sealants, pop to the shops and get some stuff called 'sticks like ....' (thats actualy its name) its an evil silicone type sealant that doesnt mind sticking to wet surfaces. Dry off the affected area (hair drier?) and wait 1/2 hour, now dry again and seal with the sealant. Dont use for at least an hour after. Dont get the stuff on yourself as its very hard to remove. Bear in mind a new connector will cost about the same as a tube of this stuff - about a fiver.
In an emergency, if you cant turn off the water to the toilet, a repair can sometimes be made by wedging the ball valve closed and siting the cistern on your knees, while stradling the toilet backwards. This assumes you have a flexi connector to the inlet.
Valve Notes
- Rim block cages - These items have made me thousands of pounds over the years - they fall in and cause an intermittant blockage as they 'catch' the passing toilet paper at the back of the U bend. Get a cageless type.
- Toilets are porcelain, its very easy to crack. Be careful.
- Working on live mains water is the quickest way to a flood
